
How to Remove Sanding Marks After Car Paint Repair
How to Remove Sanding Marks After Car Paint Repair
After a car paint repair, the surface may look smooth but still have fine scratches, dull patches or visible sanding lines. These marks are common when a repaired panel has been sanded to level dust particles, paint texture or other surface imperfections.
The good news is that many sanding marks can be reduced or removed with the right car polishing compound, polishing pad and machine.
However, removing sanding marks is not just about applying a strong compound. You need to understand the paint condition, the sanding grit used and how much correction is safe.
Using the wrong method can leave polishing haze or remove more clear coat than necessary.
In this guide, we explain how to remove sanding marks from car paint after repair, which Menzerna products can help and what to check before polishing.
Quick Answer – How to Remove Sanding Marks From Car Paint
Sanding marks can often be removed by polishing the affected paint with a suitable compound and pad.
First, confirm that the paint is ready for polishing and that there is enough coating thickness for correction. Clean the surface and test a small area using the least aggressive suitable combination.
Deeper sanding marks may need a heavy cut compound. Finer sanding marks may respond to a medium cut polish.
If the cutting stage leaves light haze or polishing marks, use a finishing polish to improve gloss.
Always inspect the result before repeating a correction step. If the marks are too deep or the paint condition is uncertain, consult a professional body shop.
What Are Sanding Marks on Car Paint?
Sanding marks are small scratches left on a painted surface during sanding.
Body shops may sand repaired paint to smooth the surface, remove dust nibs or reduce uneven paint texture.
Sanding paper contains abrasive particles that create fine scratches as they move across the surface.
The size and depth of these scratches depend on several factors.
- Sandpaper grit
- Sanding pressure
- Paint hardness
- Sanding technique
- Condition of the abrasive
- Whether sanding was performed by hand or machine
Coarser sandpaper usually creates deeper marks. Finer sandpaper generally leaves shallower scratches that are easier to polish.
For example, P1500 sanding marks are normally more visible than P3000 marks.
But grit alone does not determine whether polishing can safely remove them.
Why Does Car Paint Look Dull After Sanding?
A painted surface looks glossy when it reflects light evenly.
Sanding creates tiny scratches that scatter light in different directions.
As a result, the surface may appear cloudy, hazy or dull.
Polishing gradually levels suitable surface imperfections and improves reflection.
The objective is to remove only the material necessary to restore the desired finish.
For more information about polishing stages, read the complete guide to Menzerna polish for flawless car paint finishes.
Understand Sanding Grit Before Choosing a Polish
Different sanding grits leave different levels of surface damage.
|
Sanding grit |
Typical appearance |
General polishing consideration |
|
P1500 |
More visible sanding scratches |
May require stronger correction after professional paint assessment |
|
P2000 |
Finer visible scratches |
Test a suitable compound or polishing combination |
|
P2500 |
Light sanding haze |
A medium polishing combination may work |
|
P3000 |
Very fine sanding marks |
May respond to a less aggressive polishing combination |
This table is general guidance rather than a guaranteed product recommendation.
A coarse grit used with poor technique can cause deeper scratches than expected.
Similarly, a well-sanded surface may need fewer polishing stages than another surface finished with the same grit.
Always perform a test spot before selecting the complete polishing process.
What Should You Check Before Removing Sanding Marks?
Before choosing a compound, examine the repaired paint carefully.
Check Whether the Paint Is Ready for Polishing
Recently repainted panels may require specific curing conditions.
The correct polishing time depends on the paint system, curing method and paint manufacturer's instructions.
Do not assume that every repaired panel is ready for polishing immediately.
Ask the body shop or paint manufacturer when polishing is permitted.
Check Paint Thickness
Polishing removes a small amount of material from the painted surface.
A typical automotive paint thickness gauge measures the combined coating thickness above the underlying metal. It does not directly show how much clear coat remains.
Comparing readings can help a trained professional identify unusual coating conditions, but readings alone cannot establish that sanding or polishing is safe.
If the coating is thin, previously repaired or uncertain, avoid aggressive correction until it has been professionally assessed.
Inspect the Sanding Marks
Look at the surface under proper lighting.
Check whether the marks are uniform or whether some scratches appear much deeper.
If you notice exposed underlying paint layers, uneven repairs or damaged clear coat, stop polishing and consult the body shop.
Choose the Correct Polishing Compound
A strong compound may be useful for deeper correctable marks, but it should not be used automatically.
Starting with the least aggressive suitable combination helps avoid unnecessary paint removal.
Which Menzerna Compound Is Best for Sanding Marks?
Menzerna India offers different polishing compounds for different levels of paint correction.
The right product depends on the condition of the surface.
Menzerna Cut Force Pro for Strong Correction
Menzerna Cut Force Pro is designed for heavy paint correction.
It is intended for demanding defects such as deeper scratches, sanding marks and heavy swirl marks.
The product can be used with suitable rotary or dual action polishing equipment.
Because this is a stronger correction product, assess the coating first and follow its technical instructions.
It may be useful when milder polishing combinations cannot correct suitable sanding marks.
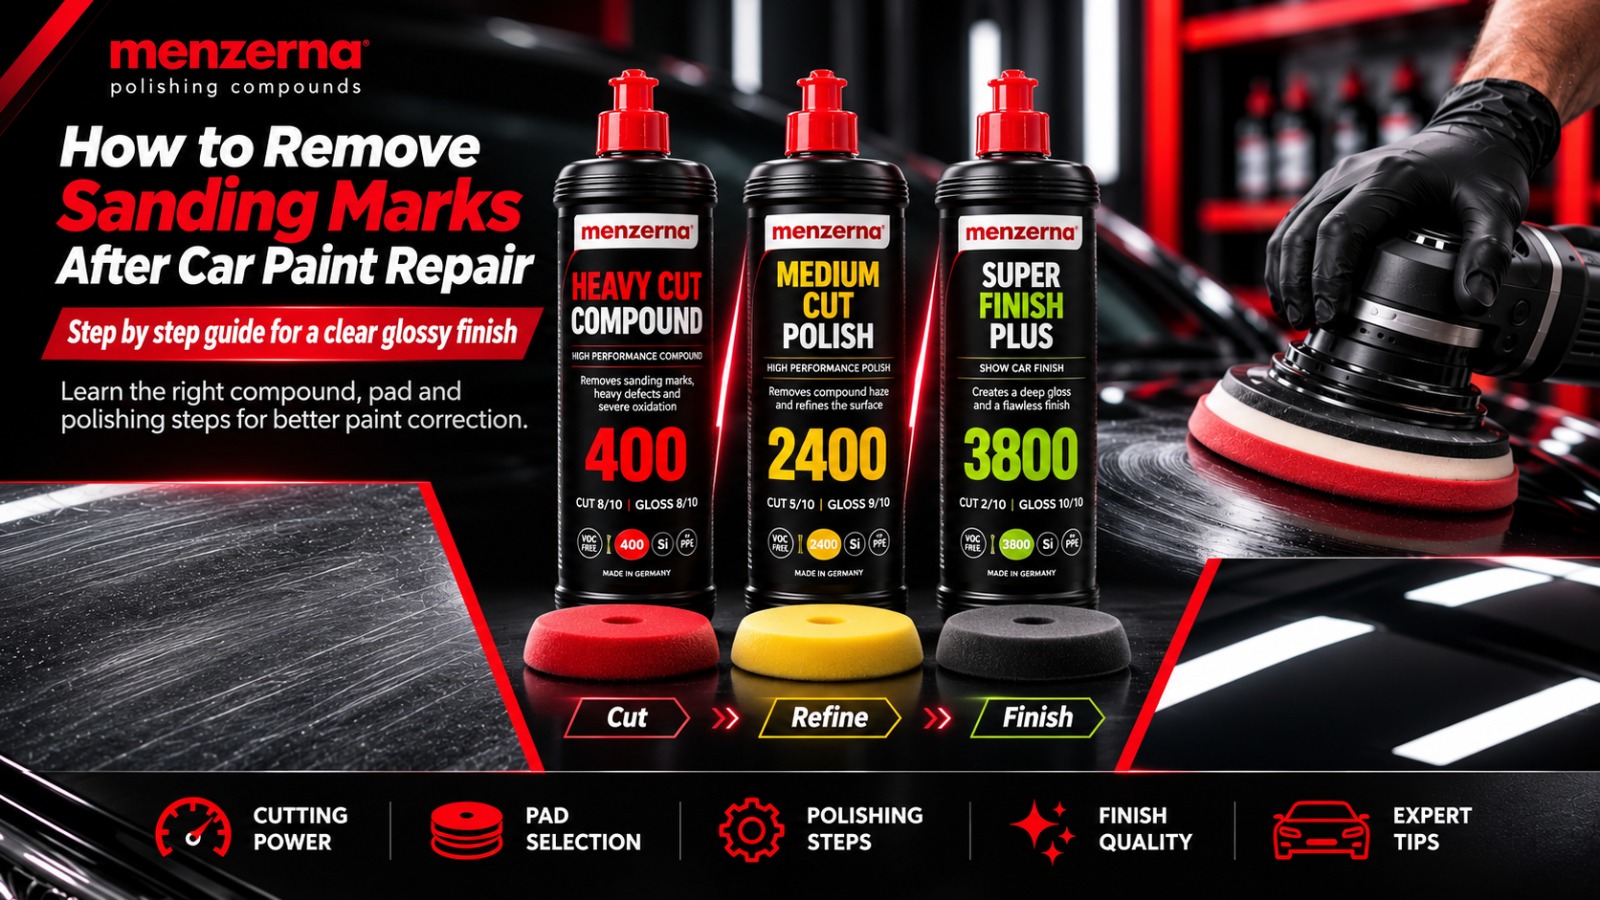
Menzerna Heavy Cut Compound 400 for Paint Correction
Heavy Cut Compound 400 is another option for professional paint correction.
Menzerna identifies sanding scratches among the defects this compound is designed to address.
It combines strong cutting ability with a relatively refined finish, although the actual result depends on the paint and pad combination.
A test spot will help determine whether another polishing stage is required.
Menzerna Medium Cut Polish 2400 for Surface Refinement
After stronger compounding, the paint may still show light haze or fine polishing marks.
Menzerna Medium Cut Polish 2400 is designed for moderate correction and surface refinement.
It can help improve paint clarity after a heavier cutting stage.
For finer sanding defects, it may also be suitable as an initial test combination.
Menzerna Super Finish Plus 3800 for Final Gloss
Menzerna Super Finish Plus 3800 is an ultra-fine finishing polish.
It is designed to help remove light micro-marring and holograms while improving gloss.
It is particularly useful when the main defects have already been corrected but the paint needs further refinement.
The finishing stage should be chosen based on inspection rather than added automatically.
Choosing the Right Car Polishing Foam Pad
A polishing compound works together with the pad.
Even a suitable polish may produce poor results if the wrong pad is selected.
Different pads offer different correction levels.
Heavy Cut Foam Pad
A heavy cut foam pad is designed for stronger correction.
It is commonly paired with compounds intended to address deeper paint defects.
Medium Cut Foam Pad
A medium cut foam pad provides a less aggressive option for moderate correction and refinement.
It may be suitable for removing haze after heavy compounding.
Soft Finishing Foam Pad
A soft finishing pad is designed for final polishing and gloss improvement.
It is useful when removing fine polishing marks left by earlier stages.
Menzerna India's car polishing foam pads collection includes heavy cut, medium cut and soft cut options.
Always confirm that the chosen pad is compatible with your polishing machine and backing plate.
How to Remove Sanding Marks From Car Paint Step by Step
The following workflow explains the main stages involved in sanding mark removal.
It is intended as general guidance for trained detailers and paint repair professionals. Work on fresh or uncertain paint should follow the repair shop's instructions.
Step 1 – Clean the Repaired Panel
Start by cleaning the surface carefully.
Remove dust, sanding residue and other contamination.
Use suitable car cleaning products and clean microfiber towels.
The surface should be dry and free from loose particles before polishing.
Step 2 – Examine the Paint Under Proper Lighting
Use an inspection light to identify the sanding marks.
Check the affected area from different angles.
Look for deeper scratches or unusual paint defects that may need professional repair rather than polishing.
Step 3 – Protect Nearby Parts
Protect rubber seals, plastic trims, badges and other sensitive surfaces as appropriate.
Raised body lines and panel edges require particular care because coating thickness can vary.
Step 4 – Perform a Test Spot
Choose a small, representative section of the repaired panel.
Test the least aggressive suitable compound and pad combination.
Follow the machine and product instructions.
Inspect the finish before deciding whether stronger correction is needed.
This is one of the most important steps because two painted panels may react differently to the same polish.
Step 5 – Correct the Sanding Marks
If the test shows that stronger correction is necessary and the coating has been assessed as suitable, a heavy cut compound may be used by an experienced operator.
For example, Menzerna Heavy Cut Compound 400 or Cut Force Pro may be considered depending on the defect.
The aim is to correct the marks without removing unnecessary paint.
Stop and reassess if the defect is not improving or the surface shows unexpected changes.
Step 6 – Inspect the Surface Again
After the correction stage, remove residue with a clean microfiber towel.
Where appropriate, use a compatible paint inspection cleaner according to its directions.
Examine the surface under suitable lighting.
Check for remaining sanding marks, haze or holograms.
Avoid repeating aggressive correction without confirming that further material removal is safe.
Step 7 – Refine the Paint if Needed
If the heavier compound has left fine polishing marks, use a suitable medium polishing combination.
Menzerna Medium Cut Polish 2400 can be considered for this stage.
The objective is to improve clarity without unnecessary additional cutting.
Step 8 – Improve the Final Gloss
If the paint still has fine haze, a finishing polish may help.
Menzerna Super Finish Plus 3800 is designed for fine surface refinement.
When used with a compatible finishing pad, it can help improve gloss and remove suitable minor polishing defects.
Step 9 – Complete the Final Inspection
Inspect the repaired area under more than one lighting condition where possible.
Check for visible sanding marks, patchy correction, polishing trails and remaining haze.
The finish should appear consistent with the surrounding panel.
Do not continue polishing simply to remove a defect that may be too deep to correct safely.
Step 10 – Protect the Repaired Paint When Permitted
Paint protection is important after correction, but fresh paint may have specific restrictions.
Follow the paint manufacturer's instructions before applying wax, sealant or coating products.
Once the surface is suitable for protection, products such as Menzerna Sealing Wax Protection may be considered.
Dual Action vs Rotary Polisher for Removing Sanding Marks
Dual action and rotary polishing machines are both used in automotive paint correction.
However, their movement and handling differ.
|
Feature |
Dual Action Polisher |
Rotary Polisher |
|
Pad movement |
Rotation with orbital motion |
Fixed-axis rotation |
|
Main advantage |
Controlled correction and finishing |
Strong direct correction capability |
|
Heat management |
Often easier to manage |
Requires more careful control |
|
Common applications |
General correction and finishing |
Professional correction work |
|
Skill requirement |
Training still required |
Greater operator experience recommended |
A dual action polisher is often preferred for general correction and finishing.
A rotary polisher may be useful in professional repair environments where stronger correction is needed.
Neither machine makes excessive paint removal safe.
Choose the machine according to the paint condition, defect severity and operator experience.
Why Are Sanding Marks Still Visible After Polishing?
Sometimes sanding marks remain after the first polishing stage.
There may be several reasons.
|
Problem |
Possible reason |
Recommended action |
|
Sanding lines remain |
Defects are deeper than the selected combination can safely correct |
Stop and reassess paint condition |
|
Cloudy appearance |
Fine polishing haze or incomplete correction |
Test a suitable refining polish |
|
Holograms |
Rotary polishing marks |
Consider a compatible finishing combination |
|
Uneven gloss |
Inconsistent correction or underlying repair texture |
Inspect the finish and repair quality |
|
Marks return after cleaning |
Residue may have temporarily hidden defects |
Inspect with a compatible panel cleaner |
|
Visible coating damage |
Previous sanding or polishing may have removed too much material |
Stop and consult a paint repair professional |
Do not automatically repeat sanding when marks remain.
Further sanding removes more coating and should only be considered after a professional has assessed the repair.
Common Mistakes When Removing Sanding Marks
Using Heavy Compound for Every Defect
Not every sanding mark needs aggressive correction.
Finer marks may respond to a milder polishing product.
Skipping Paint Inspection
Without checking the surface, it is difficult to choose the right correction method.
Using an Unsuitable Polishing Pad
The pad affects the amount of correction and the final finish.
Use a combination suited to the paint and product.
Ignoring Fresh Paint Curing Requirements
Fresh paint may not be ready for machine polishing or protection.
Always follow the paint system's technical guidance.
Polishing the Same Area Repeatedly
Repeated correction removes more material.
If the marks remain after a reasonable test, reassess instead of continuing blindly.
Using Dirty Pads and Towels
Contaminated polishing accessories can create additional scratches.
Keep pads and microfiber towels clean.
Skipping the Final Inspection
A panel may appear glossy under one light but still show marks under another.
Inspect the finished surface carefully.
How Professional Body Shops Can Improve Paint Correction Results
Body shops and car detailing studios often handle vehicles with different paint systems, repair histories and surface conditions.
A standard polishing combination will not produce the same result on every panel.
For example, a newly repainted car door may behave differently from an older factory-painted bonnet.
Professional teams can improve consistency by checking the repair history, following paint curing instructions, inspecting coating thickness and recording which combinations work on different surfaces.
Keeping separate pads for cutting and finishing also helps reduce contamination between polishing stages.
Menzerna India's range of heavy cut compounds, medium polishes and finishing products allows workshops to select products according to their correction requirements.
Frequently Asked Questions
Can sanding marks be completely removed from car paint?
Many fine sanding marks can be removed through suitable polishing. However, deeper defects may not be safe to remove completely. The result depends on sanding depth, paint condition and remaining coating thickness.
Which Menzerna compound removes sanding marks?
Menzerna Cut Force Pro and Heavy Cut Compound 400 are designed for stronger paint correction, including sanding marks. The appropriate choice depends on the surface and a test spot.
Can P2000 sanding marks be removed by polishing?
P2000 sanding marks can often be corrected, but the result is not guaranteed. Paint hardness, sanding pressure and coating condition affect how easily the marks can be removed.
Is a heavy cut compound always needed after wet sanding?
No. Finer sanding marks may respond to a medium polishing combination. Always start with the least aggressive suitable method.
Why does the paint look cloudy after using a rubbing compound?
Cloudiness may result from fine polishing marks, incomplete correction or residue. A suitable refining or finishing polish may help if the coating is in good condition.
Can freshly painted car panels be polished immediately?
Not necessarily. The correct polishing time depends on the paint system and curing process. Follow the paint manufacturer's and body shop's instructions.
Final Thoughts
Removing sanding marks after car paint repair requires more than selecting a strong compound.
The correct method depends on the paint condition, sanding depth, polishing machine and pad selection.
Start with proper inspection and use the least aggressive combination that can achieve the desired result.
Heavy cut compounds can help with suitable deeper defects, while medium and finishing polishes can improve surface clarity and gloss.
For fresh or previously repaired paint, follow professional guidance and avoid unnecessary material removal.
Complete Your Paint Correction Process With Menzerna India
Menzerna India offers professional polishing compounds, finishing polishes, foam pads and paint protection products for automotive detailing and body shop applications.
From Heavy Cut Compound 400 and Cut Force Pro to Medium Cut Polish 2400 and Super Finish Plus 3800, the range supports different stages of paint correction.
Explore the Menzerna car care collection to compare available products and choose suitable polishing accessories for your application.


No comments yet. Be the first to comment!