
How to Clean Foam Polishing Pads After Car Polishing
How to Clean Foam Polishing Pads After Car Polishing
The polish is wiped off, the paint looks great, and you are tired. The last thing you want to do is wash a pile of sticky pads. So they get tossed in a corner, and the compound inside them dries into a hard crust.
That shortcut costs more than it saves. A crusty pad cuts unevenly, picks up dust, and can leave marks on the next car. A clean pad, on the other hand, can be used again and again.
This guide shows how to clean foam polishing pads the right way, from quick cleaning between panels to a full wash, drying, and storage. It is written by the Menzerna India team. We supply Menzerna car polishing pads and compounds across India, and the steps below follow what careful detailers do in their own workshops. You will also find tips for cutting pads, a simple care checklist, and answers to common questions.
How to Clean Foam Polishing Pads?
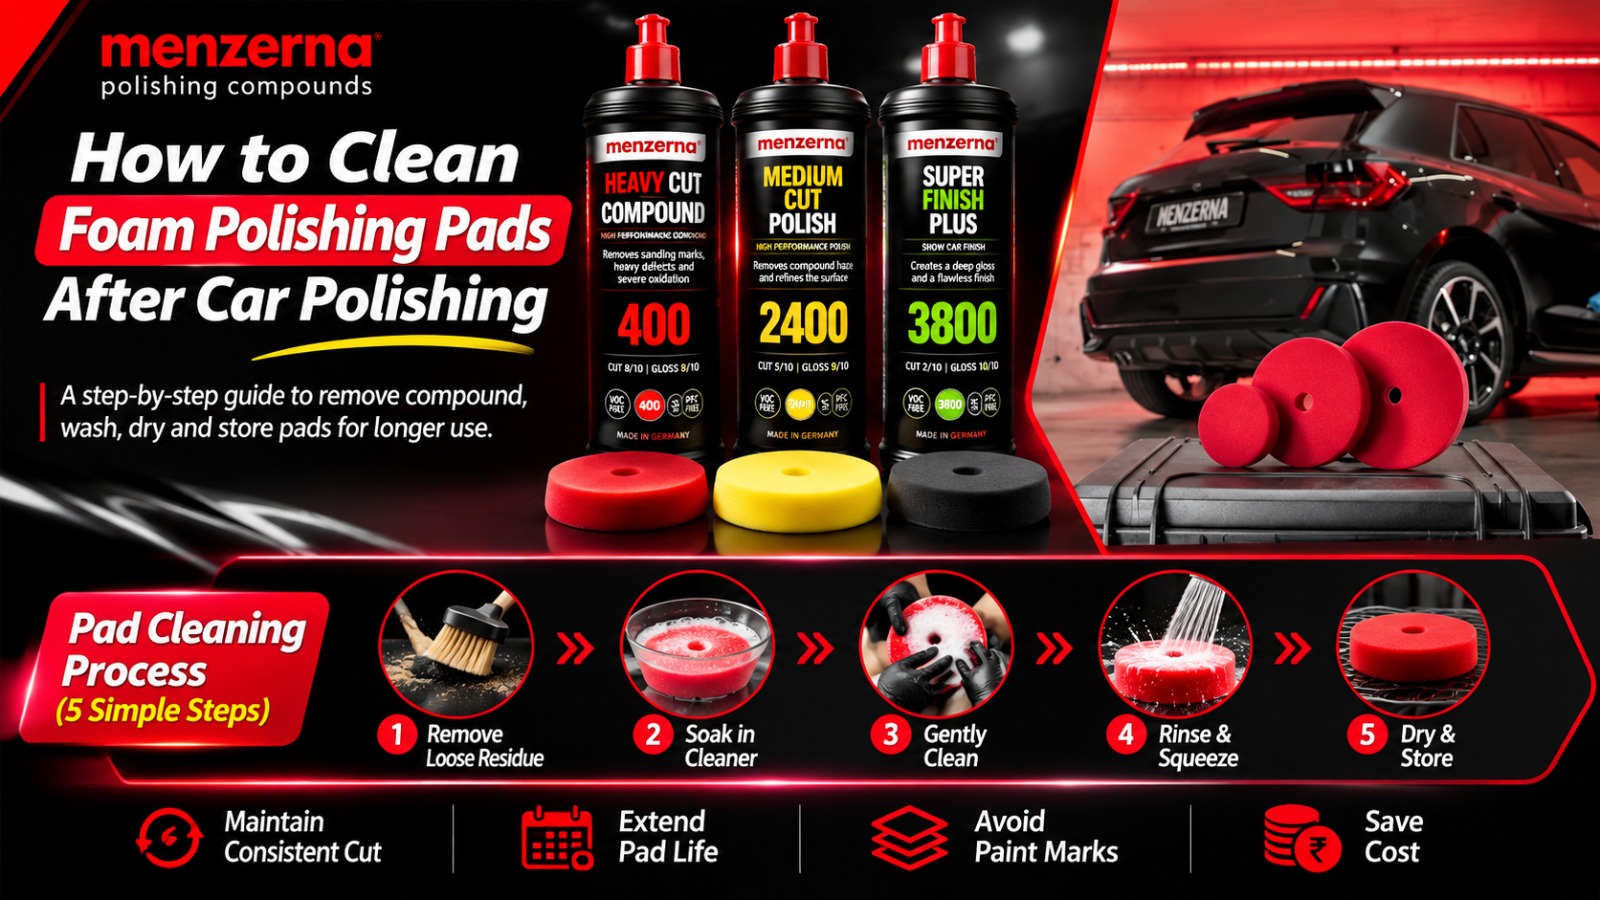
Clean the pad soon after you finish, while the polish is still soft. The process takes five steps:
- Brush or tap off the loose residue.
- Soak the pad in lukewarm water with a pad cleaner or a little mild car shampoo.
- Work the foam gently with your fingers until the polish lifts out.
- Rinse until the water runs clear, then press out the water without twisting.
- Dry the pad flat or on a rack, away from heat and direct sun, and store it clean.
The rest of this guide explains each step, and what to do when the polish has already dried hard.
Why You Should Clean Pads After Every Job
Knowing how to clean foam polishing pads is part of good polishing, not an extra chore. Here is why it matters:
- Steady cut and finish: Old residue fills the tiny cells in the foam. The pad then stops spreading polish evenly, and the result looks patchy.
- Less heat: A clogged pad holds heat, which is harder on both the pad and the paint.
- Fewer marks: Dried lumps of compound and bits of dust can scratch the next panel.
- No mixing: Old heavy compound left in a finishing pad can leave scratches that the finishing polish then has to fix.
- Lower cost: Reusable foam polishing pads last much longer when you clean them, and a studio that uses many car detailing foam pads saves a lot over a year.
Foam Polishing Pad Cleaning Kit: What You Need
You do not need much. Here is a simple kit:
- A polishing pad cleaner, or a mild, pH-neutral car shampoo
- Lukewarm water in a clean bucket or tub
- A soft brush for the pad face
- A stiffer pad brush for between-panel cleaning
- Clean microfiber towels
- A drying rack or a mesh surface with air flow
- A clean zip bag or box for storage
Quick Cleaning Between Panels
Pads load up with polish and paint residue as you work. Cleaning foam polishing pads on the go keeps the cut steady from the first panel to the last.
- Switch the machine off before you touch the pad.
- Brush the face of the pad lightly with a pad brush to lift out the used compound. If you have compressed air, a short blast also helps.
- Wipe the panel with a clean microfiber so no loose residue stays behind.
- Swap pads when the foam feels heavy or saturated. Keep three or four pads for each step, so you always have a fresh one.
This kind of machine polishing pad cleaning takes seconds, and it makes the final wash much easier. Do not soak the pad in water in the middle of a job, unless the polish instructions say it is fine.
Step by Step Ways to Wash Polishing Pads
Here is how to clean foam polishing pads by hand after the job is done.
- Remove loose residue: Tap the pad and brush off dry bits.
- Rinse first: Run lukewarm water over the face to loosen the polish. Do not use hot water, which can harm the foam and the glue.
- Add the cleaner: Put some cleaner on the pad, or fill a tub with water and cleaner.
- Soak: Let the pad sit for 10 to 15 minutes. Follow the label on your cleaner.
- Work it with your fingers: Squeeze and release the foam gently so the cleaner moves through it. Brush the face lightly with a soft brush.
- Rinse well: Keep rinsing until the water runs clear and the foam feels free of slick residue.
- Press out the water: Squeeze gently or press the pad between two clean towels. Never twist or wring it hard, because that can tear the foam.
- Dry it fully: See the drying section below.
Wash each pad before it dries. A pad that is washed within a day is much easier to clean than one left for a week.
How to Remove Polish From Foam Pads That Have Dried Hard
Dried compound is annoying, but it can often be softened.
- Soak the pad in lukewarm water with a cleaner for 20 to 30 minutes.
- Knead it gently and brush the face with a soft brush.
- Rinse, and repeat if the pad still feels stiff.
- Do not use hot water, a stiff wire brush, or strong solvents. They can damage the foam and the glue that holds it to the backing.
If the pad is still hard after two or three tries, it is time to replace it. A crusty pad will not cut or finish well, however carefully you wash it.
Choosing a Polishing Pad Cleaner
A good cleaner makes the job faster. Look for these points:
- It is made for foam and does not leave a slick film after rinsing.
- It breaks down polish without harsh solvents.
- The label says it is safe for foam and for the backing.
- It rinses out easily with plain water.
A mild, pH-neutral car shampoo also works for light cleaning. Avoid bleach, strong degreasers, solvent cleaners, and fabric softener. They can leave residue or weaken the foam.
How to Dry Foam Polishing Pads
Drying is where many people go wrong. A damp pad can dilute your polish, and a pad stored damp can start to smell or grow mold.
- Press out as much water as you can with a clean towel.
- Lay the pad flat on a rack or mesh, or stand it on its edge, so air reaches both sides.
- Keep it away from direct sun, heaters, and hair dryers. Strong heat can harden the foam and loosen the backing.
- Allow enough time. Drying can take many hours, sometimes a full day, depending on the weather.
- Check the middle of the pad. It should feel dry and light before you use it or store it.
In humid weather, such as during the monsoon, put the rack in a room with good air flow, and use a fan if you can.
Foam Cutting Pad Cleaning - Extra Care for Heavy Cut Pads
Pads used with heavy cut compounds load up faster and hold more residue. Foam cutting pad cleaning needs a little more time and attention. The same steps for how to clean foam polishing pads still apply, but:
- Clean them soon after the job, before the compound hardens.
- Soak them a little longer.
- Check the foam for tears, because heavy cutting is hard on pads.
Menzerna pads are colour coded to make this easy to organise: red for heavy cut, yellow for medium cut, and green for soft cut and finishing. They come in 6 inch and 7 inch sizes. See the full range of car polishing foam pads, and learn how to match them with heavy cut compounds for the right correction. For a deeper look at choosing pads, read our car polishing foam pads guide for cutting and finishing.
Foam Buffing Pad Cleaning for Different Pad Types
Not every pad is cleaned the same way. This table covers the common types:
|
Pad type |
How to clean |
Care note |
|
Foam |
Hand wash with cleaner or mild shampoo |
Squeeze gently, never twist |
|
Wool |
Brush or comb to fluff the fibres, then wash gently by hand |
Dry fully, since wool holds water |
|
Microfibre |
Rinse, soak, and brush lightly |
Do not let it dry with polish in it |
Foam buffing pad cleaning follows the same idea for all of them. Remove loose residue, soak, rinse well, and dry fully. If you are unsure how to clean buffing pads of a particular make, check the packaging for the maker's advice first.
Car Polishing Pad Maintenance Checklist
Good car polishing pad maintenance is a habit, not a big task. Use this simple schedule:
|
When |
What to do |
|
After every panel |
Brush the pad, wipe the panel, and swap the pad if it feels heavy |
|
After every job |
Wash and dry every pad |
|
Every few weeks |
Check pads for tears, a loose backing, and clogged foam |
|
Regularly |
Sort your pads by step, and replace the worn ones |
One more tip: mark the backing of each pad with a permanent marker to show which compound it has been used with. This stops you from mixing a heavy cut pad with a finishing polish by mistake.
Polishing Pad Care Tips
These polishing pad care tips keep your pads working for many sessions:
- Make learning how to clean foam polishing pads a habit, and wash them the same day.
- Use lukewarm water, not hot.
- Keep one pad for each compound and each step.
- Never leave pads in a bucket of water overnight.
- Store dry pads flat or hanging, in a clean bag or box, away from dust and sun.
- Brush the hook-and-loop backing gently, so it keeps its grip.
- Look at your pads often, and replace them before they cause damage.
When to Replace a Pad
A clean pad should not last forever. Replace it if:
- The foam is torn, crumbling, or cut at the edges
- The face stays hard even after soaking and washing
- The pad has lost its shape and sits unevenly on the backing plate
- The backing no longer holds the pad firmly
- The pad leaves marks even when it is clean
A worn pad can mark the paint you just spent hours correcting. A new pad costs far less than a repair.
Common Mistakes to Avoid
- Leaving used pads to dry with polish in them
- Using hot water, strong solvents, or bleach
- Twisting or wringing the foam
- Not learning how to clean foam polishing pads before the first big job
- Drying pads in the sun or with a heater
- Storing pads while they are still damp
- Using one pad for several different compounds
- Keeping a pad long after it has gone hard
Choose the Right Car Polishing Pads with Menzerna India
Clean polishing pads help you achieve better paint correction, a smoother finish, and consistent results. However, choosing the right pad and polishing compound is just as important as cleaning them properly. At Menzerna India, you can explore a range of professional car polishing foam pads and compounds designed for different stages of paint correction.
Whether you are removing scratches, correcting swirl marks, or improving paint gloss, Menzerna offers polishing solutions for professional detailers, car detailing studios, and car care enthusiasts.
Explore our car polishing foam pads to find suitable options for cutting, polishing, and finishing. You can also check our heavy cut compounds and 4-step polishing program to understand the complete process.
Need help selecting the right polishing pad or compound? Contact Menzerna India today for product guidance and professional polishing solutions.
Final Thoughts
Knowing how to clean foam polishing pads is one of the simplest ways to get better results. Clean pads cut evenly, finish cleanly, and last much longer. Brush them between panels, wash them soon after the job, dry them fully, and store them clean.
It takes a few extra minutes, but it protects your paint, your time, and your money. With the right car polishing pads and these simple habits, you will get the same smooth result from the first panel to the last.
Want to see how pads fit into the full process? Explore our 4-step polishing program, from heavy cut to final protection.
Frequently Asked Questions
How to clean foam polishing pads without damaging them?
Use lukewarm water and a gentle cleaner, work the foam with your fingers, rinse until the water runs clear, and press out the water without twisting. Dry the pad flat, away from heat.
Can I wash polishing pads in a washing machine?
Some detailers do, but we suggest hand washing. A machine can wear the backing and tear the foam, especially on a spin cycle.
How do I remove polish from foam pads that have dried?
Soak the pad for 20 to 30 minutes in lukewarm water with cleaner, knead it gently, and repeat if needed. If it stays hard, replace it.
How long do reusable foam polishing pads last?
There is no fixed number. It depends on how often you polish, the compound you use, the pressure, and how well you clean and store the pads. Replace a pad when it tears, hardens, or stops working evenly.
How long does it take to dry foam polishing pads?
Often several hours to a day. The time depends on the weather and the air flow. A pad is ready when the middle feels fully dry.
How do I clean buffing pads like wool and microfibre?
The steps are the same: remove loose residue, soak, rinse, and dry fully. Wool pads also need a brush or comb to fluff the fibres.


No comments yet. Be the first to comment!